I love to ski bumps; however I’ve had to modify my approach as I get older so that the repeated impact doesn’t wear me out. While I can ski a “zipper line” of bumps, I find that it’s much harder on my body. I try to avoid the much bigger absorption that skiing directly into the front of the trough requires.
This discussion assumes that you can already ski short-radius turns on a black slope. If not, you can revisit my previous post on short turns. With those skills in-hand, there three keys to mastering the bumps: pressure control, pole usage, and tactics.
Pressure control in the bumps is the flexing and extension of your legs to keep your skis in contact with the snow over uneven terrain. As you ride up onto the bump, allow your legs to absorb the impact starting with your ankles. Keep your core strong and don’t break at the waist. As you come off each bump, extend your legs so that you can absorb the next bump. I see skiers forget to do this and after a few bumps, they “explode” as they have no way to absorb the terrain.
Pole usage in the bumps is essential. You must touch every bump you ski with a pole. This helps your timing and flow, and allows you to stabilize your upper body.
Once you have mastered pressure control and poling, bump skiing is all about line and tactics. Although you can carve in the bumps, I’ve found that the best approach is to use a more skidded turn. This is particularly true with rockered skis.

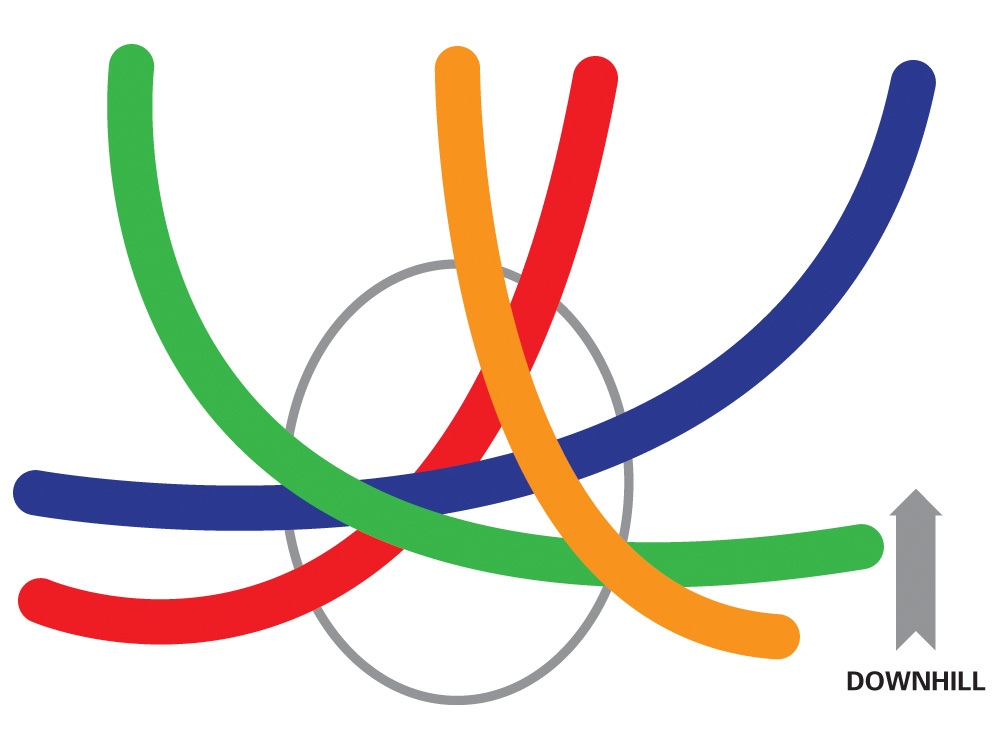
Think of a bump as having four doors with the one directly below the trough being the front door – consider that locked and don’t enter there. Instead, enter from the side doors and turn on top of the bump where your ski’s tip and tails are off the snow so that it’s easy to pivot. In the diagram at the top, the red and orange lines enter the side of the bump and exit the back door. A longer turn would be the green and blue lines where you enter the side door and exit out the other side.
Occasionally, you’ll need to ski a zipper line turn or two, but using this alternate approach will reduce the pounding on your body. Add in good pressure control and pole usage and you’ll be rocking the bumps for a long time. If you want to learn more about this approach, a clinic with your local PSIA Level 3 certified instructor can help — they are well trained in skiing and teaching bumps.

This is an eye opener for me. I started skiing late in life, and have only been skiing bumps for the last few years. All this time I assumed that the method that I “invented” was wrong, but I figured it got me through the bumps with a smile – so I didn’t care. Turns out what I was doing is actually legit. I always assumed it was easier to turn that way because my skis are basically unweighted at the apex of my turn. It never occurred to me that my tips and tails were free.
When you watch the attached video you can see the side door bump turn easiest if you pay attention to the longer turns. This also is a good tactic to use when you are changing lines.
I am finally beginning to “see” a line in bumps but only seem to ski them well when they are relatively soft. Belleayre has a 2-day bump clinic coming up Mar 3-4 that I plan on attending. POV from last friday a.m. http://vimeo.com/36981747
Febe / Chris I watched your video and it looks like you skied the zipper line really well – nice skiing! You have the pole usage of touching every bump down pat. Also the video did not move up and down a lot so you are absorbing the bumps well with your legs so your pressure control is excellent.
It does look soft and forgiving. I noticed you tended to stay off to the one side where the bumps were smaller. I’d encourage you to try out the different tactics I’ve outlined to give you more options for turn shape and size and bump usage. The bumps are not always this accommodating so being versatile will make you a better skier in all conditions and bump fields. Again really nice skiing!
Excellent information. The zip line is a distant memory for me.